As we all know the Popular Turbo C 3 [C and C++ compiler by Borland] does not run well on 64 bit OS’s like Windows 7,Windows 8 etc,and on 32 bit OS’s they cant work fullscreen, so we have developed the emulated version of the same TurboC compiler within an environment called DosBoX which works on all OS’s Fullscreen
normal DosBoX installations require you to download DosBox separately and then mounting the turboc directory and all which was a headache..with our installer you don’t need to mount/configure anything everything is done automatically!.. Just install and Go! you can start using TurboC as soon as you install this..! Really Simple as 1…2…3…


 Click here To Download Turbo C/C++ 4.0 For Windows 
In general, hacking and information security is not just one discipline, but a number of them, and today we will look into some of the networking concepts.In the last Hacker Fundamentals, we talked about the OSI model as well as a little on TCP/IP and the protocols that make up the suite. Now, we're going to expand on that now and take a look at the various parts of a network that you might have heard about, but might not understand.


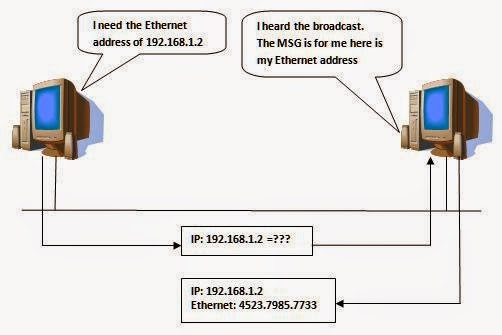
We already covered how your data travels the OSI model, layer by layer, and talks with other machines on your local network. But how does that data leave your network? How does it know where to go? What's going on here?Much of the 'talking' on a local network are broadcasts. This computer is asking for the MAC address of another one, or asking for a local IP address, or any number of things. But doesn't that mean the Internet should be flooded with various broadcast noise all over the place? As it turns out, no. You see, the job of a router is not only to route traffic, but to stop broadcasts. To explain this concept fully, let's look into some examples.No routers were hurt in the writing of this article.A Tale of Two Packets: InternalIf you remember correctly, an IP address has two components, the network section and the host section. A subnet mask separates the IP address into those two segments (). A subnet is expressed just like an IP address in a four octet form, the most common one being 255.255.255.0 where the '255' means those octets are describing the network and the '0' is describing the host.Let's say you wanted to send data to another computer on your local network at home. Your internal IP address in this example is 172.10.1.20and your destination IP address is 172.10.1.30. Also, let's assume your subnet mask is a standard 255.255.255.0.The first thing that gets done is the computer looks at the address on the packet being sent. It then compares its address with the destination address. Notice the 172.10.1.x is the same on both, and the subnet mask has filled octets in the same locations as well ( 255.255.255.0). This tells the computer that the destination is on the same network it is on. Your computer knows it is host '20' and it needs to reach host '30' and it doesn't need to go through a router to get there.Now your computer only needs to know the MAC address of host '30' to send this data on its way. If you recall the Media Access Control address is a physical layer function that addresses actual physical hardware on your computer. In a nutshell, it works like an IP address, only on your local network.ARP!To perform this feat, your computer sends out a broadcast message to everyone on the network called an ARP, or Address Resolution Protocol. It's like your PC yelling "HELLO! I am looking for the computer 172.10.1.30".Now each device on the network receives that message and looks at its own IP address in turn. The router (172.10.1.1) sees it is not the one being looked for and drops the message. Other computers on the network do the same thing until the computer that has the IP of 172.10.1.30 gets it, checks its address, and sees they match. It then replies back to the sending computer of 172.10.1.20 saying "HEY! That's me and my MAC address isAA00:BC33:3211".In the picture below, the MAC address is called an "Ethernet address", reflecting the fact that it's addressing for the physical layer. However, common lingo is "MAC address".


Now the sending computer has the internal IP and MAC address of the receiving computer and can send its data over. But what happens if the two addresses are not on the same network?A Tale of Two Packets: ExternalWell, it's not as simple when we have to cross other networks, as there is a bit more going on behind the scenes, as you will see. Let's assume we are sending the same data as before and our source IP address is 172.10.1.20and our destination IP address is 192.168.0.100. You should immediately notice by the subnet mask of 255.255.255.0 that these two addresses are on separate networks. See, we are getting there.Just like in the first example, the sending computer looks at the destination address and compares it to its own. However, this time there is a problem—they don't match at all.Now it knows that it can't just send out an ARP message like before, because remember what happened in the last example, when the routers address didn't match the address being asked? It simply dropped the packet. This is how routers stop broadcasts from traveling the entire Internet. In fact, without this design, the Internet would be flooded with so many broadcast messages from the millions of connected devices that it would crash and fail.

                   
At this point, your computer knows an ARP just isn't going to cut it for the destination of 192.168.0.100, so it broadcasts another ARP. But this time is looks for what's called the default gateway. This is a node, or a router, that acts as an entry or exit point to another network.Normally, when a computer cannot find a route for an IP address, it will send it along to the default gateway as a route of last resort. This is your modem/router at home. Your router will reply saying, "YO! I am the default gateway and my MAC address is xxxx:xxxx:xxxx!"Your computer then adds the routers MAC address as the destination MAC address to the packet, and sends it over to the router for safe travels.Route Me Baby!The router takes a look at the packet and knows the source IP came from its own network. But the destination is separate altogether. Because the destination is not the same as the router's own internal IP address, it knows the packet is not for it, but needs to travel through it.


The router then looks at its routing tables to find a way to get to the192.168.0.x network. It leaves the source and destination IP address information inside the packet, and changes the new source MAC address to its own address and the destination MAC address to the next node deducted from the routing table.This process continues over and over with each router that picks up the packets looking at the addresses, seeing it's not for their network and passing it along until it reaches the final destination of 192.168.0.100.That router will strip of the source and destination MAC addresses that allowed the packets to travel, and replace the source with its own. It then ARPs to find the MAC address of the server being looked for and uses the reply to add the final MAC address of that machine, then sends it along.


Steps to change ip address in Windows :-

  •     Click on start and then control panel.
  •     Select Network And Internet.
  •     Click on Network and Sharing Centre.
  •     Select Change adapter settings at left side.
  •     Now Right click on the network which you are currently being connected.
  •     Select properties.
  •     Double click on Internet Protocol Version 6(TCP/IPv6).
  •     Click on Use the following IPv6 address: .
  •     Now type any Ip address which you want to set.
  •     Double check the Vlidate button at bottom and then click OK.

Thats it you have changed your ip address. Now your system will have new ip address assignedby you. Now every packets sent to Networking layer will have Ip address which you have changed.You van also revert back the default ip adress by repeating upto 7th step and then clicking Obtain an Ipv6 address automatically and then clicking ok.

Method To Change Ip Address In Mac OS X:-

Steps to change ip address in MAC X :-
  •     Click on Apple logo at right top corner of  the desktop.
  •     Select system prefrences from the drop down list.
  •     Select the network icon from there (the icon with silvered colour).
  •     Now select the network which you want to connect either wifi, broadband or any other network.
  •     Now click on advanced grey coloured button.
  •     Now select TCP/IP  tab at the top.
  •     Now  select the Using DHCP with manual address option from the drop down menu to the right of Configure IPv4.
  •     Now enter the ip address you want to set.
  •     Also enter subnet mask there.
  •     Now click on grey Ok button at right and click on apply button.
By this your ip address will be change and now your all network working will have that ip address . You can also revert back the settings to automatic that will set your ip address that will be provided by your network.

How To Change Your IP Address 2015 in Windows & MAC OS X – Changing ip address to your desire ip address may break your connection with main server and you will be not able to access internet at that stage you will have to revert back the ip address to automatic that has been set by network as discussed above. If you face any problem feel free to leave comments in below;
A key-logger could be a hardware or a software program which tracks the keys struck on the keyboard secretly. In most of the cases, the user is unaware of the key-logger tracking the key strokes as the sole idea behind using a key-logger is to track the key strokes secretively. If you are worried about the leakage of vital confidential information by an employee or you want to keep tap on your kids or if you are in the IT department of your company and want to debug certain problems with ease, here are five best free key-logger software for windows.


1. Actual key-logger

Actual key-logger runs hidden in the background and automatically records almost all keystrokes. Generated log files can be in encrypted form and the interface can also be protected with password. One can view the reports in form of plain text or in the form of HTML. The log file displays all typed matter,online money transactions etc. If this software is running in hidden mode then it becomes invisible (on all the OS). Information will be accessible only by the key-logger installer.

2. REFOG Free key-logger

REFOG Free key-logger is a free software program which works like a tape recorder running in hidden mode. It captures all the typed data, username, passwords, emails, chats etc. once the computer turns on. You can block the detected website with the help of firewalls if you wish to do so.

3. Home key-logger

Home key-logger is again a free software program intended for recording all the matter entered from the keyboard. The program neatly records every activity or event while working in the hidden mode. This key-logger is small in size and has low system requirements

4. Revealer key-logger

Revealer key-logger is a software program that records all the matter or activity of PC and generates a report for the installer or administrator. This software records information about keyboard inputs, the executed programs, visited pages and opened file. It records the date and time of these actions to know when they were done. Best part is that, this is completely invisible, and does not appear on Desktop.

5. Kidlogger

Kidlogger is a very simple software program designed with an intention of tracking kids activities by parents at home. It records in a logfile, all the activity of a user on internet like chat room interactions, all the visited websites etc. That is why it is kept simple for meeting family requirements.
Keeping your laptop cool is essential to preventing it fromoverheating. Excess heat build-up in a laptop can result in the laptop overheating, which could cause damage to the internal components. When a laptop overheats, most often it will shut down automatically in an attempt to prevent any damage.

Preventing heat build-up is important and should be considered when purchasing and using a laptop. To help reduce heat build-up and keep the laptop cool, you can use a cooling pad.


Cooling pads come in multiple varieties. Some are basic pads, which allow for better airflow on the underside of the laptop, where heat build-up is more common to occur. Other cooling pads have fans built-in to help pull heat away from the laptop, thus improving airflow and keeping the laptop cool.

You can purchase cooling pads from most computer retailers and online. Prices range from $15 to $75, or more for the really nice ones. However, cooling pads in the $35 to $50 are typically adequate for most everyday laptop cooling needs. We recommendeda cooler pad with a built-in fan since it will offer a much better cooling solution. Most, if not all, of those cooling pads plug into the laptop for power, using a USB connector. They are light-weight, and most are pretty quiet when running.

Short of buying a cooling pad, another way to keep your laptop cool is to place the laptop on a table or flat, hard surface when using it. This allows the bottom of the laptop to be elevated above the surface it is sitting on, which keeps air flowing underneath and around it. Also, make sure there are no objects sitting close to either side of the laptop. Many laptops push warm air out the sides of the laptop, and if the sides are partially or completely blocked by an external object it will prevent heat from escaping. The heat could build up and cause the laptop to overheat.

Also, try to use the laptop in an environment that is not too hot or humid, as this can cause excess heat to build up in the laptop
When the touchpad stops working, there are a few things you can do to try and fix it or work around the issue.

Tip: Since some of the settings do require you to navigate the computer using a mouse cursor, for troubleshooting purposes, you can use the Trackpoint on the laptop or connect a PS/2 or USB external mouse to the laptop as a temporary fix. If you cannot get an external mouse to work, see our navigating Windows with the keyboard page for tips on how to use the keyboard to navigate in Windows.

Other USB device

Some USB and PS/2 devices, especially any USB input device (including a computer mouse), can disable the touchpad. As a troubleshooting step, turn off the computer, disconnect all USB devices, then start the computer again to make sure an external device is disabling the touchpad. If this fixes your problem, but the touchpad is disabled again the next time you connect the device, check your touchpad softwaresettings for a setting that can prevent this from happening.

Check mouse settings

First, in the Windows Control Panel, access the mouse settings and verify the touchpad is enabled. Also, you can adjust the sensitivity of the touchpad to work best for your fingers. Check these settings to make sure something was not disabled or adjusted to cause the touchpad to not work.

Check Device Manager

Second, open the Device Manager and check through the device list to find the touchpad. Check to see that it is enabled. If disabled, re-enable it and test the touchpad. If it is already enabled, change it to disabled, then re-enable it again. Sometimes toggling this setting can kick-start the touchpad into working again.

If there are any yellow exclamation marks, red X's or "Other devices" in Device Manager, any of these errors can indicate there is a problem with hardware in your computer that may be causing the touchpad problems.

Check CMOS (BIOS) setup

Make sure the touchpad has not been disabled in the CMOS (BIOS) setup. In the setup, check the hardware device settings and see if the touchpad is enabled or disabled. If disabled, re-enable it, restart the laptop, and test the touchpad.

Software driver issues

If the above options do not fix the problem, the software driver for the touchpad may be corrupted or not updated enough to work correctly. Visit the laptop manufacturer's website and download the most current touchpad driver for your specific laptop model. Install the driver, restart the laptop, and test the touchpad to see if it works.

Hardware defect

Lastly, if the touchpad still is not working correctly or at all, you may need to take it to a computer repair shop and have it fixed. It could require replacement of the touchpad itself or another component in the laptop. If you cannot repair the touchpad, connect and use an external mouse as a workaround.
Imagine a world where you are a God and have ultimate control on what happens and more importantly, how it happens. Seems too good a dream. Now it has come true, at least for the online world.

JavaScript tricks
Using this trick, you will be able to edit any webpage live in your browser as if it was a Wiki and change the details according to your wish. Yes, you read that right. You can edit Google or even Facebook for that matter right in your browser and that too without requiring any technical know-how or getting deep into hacking and cracking.

Here is an example picture demonstrating the Google Homepage edited by me to say that I own Google.


This is just an example. You can use it for anything like showing wrong traffic stats or for fooling people by showing that someone said something about them on Facebook or Twitter. It depends only on your creativity. But I would advise you to stay ethical and use it for entertainment purposes only.

(Mozilla Firefox does not support this. If you use Firefox, you can use the bookmarklets given at the end of this post. If you use Google Chrome and the code does not seem to work, precede it with "javascript:" without quotes.)

To use this trick, all you need to do is just copy the code given below and paste it in your address bar after you have opened the website you wish to edit. And start editing.

javascript:document.body.contentEditable%20=%20'true';%20document.designMode='on';%20void%200
You can capture a screenshot by pressing the Print Screen key or by using the Snipping Tool if you use Windows 7 or Windows Vista. If you wish to again make the website non-editable to give a more authentic look, copy and paste the code given below in the address bar after you are done editing (does not work in Firefox).

javascript:document.body.contentEditable%20=%20'false';%20document.designMode='off';%20void%200

Or, alternatively you can use the following bookmarklets by dragging them to your Bookmarks bar.

1.  Edit this Website

2.  Done Editing

The editing that you do will however be temporary as it is not server-sided. You can also save the modified website through your browser by File>Save. This works on all common web browsers including Chrome, Firefox, Opera and Internet Explorer.